
NOTES

Toward Recovering Blake’s Relief-Etching Process
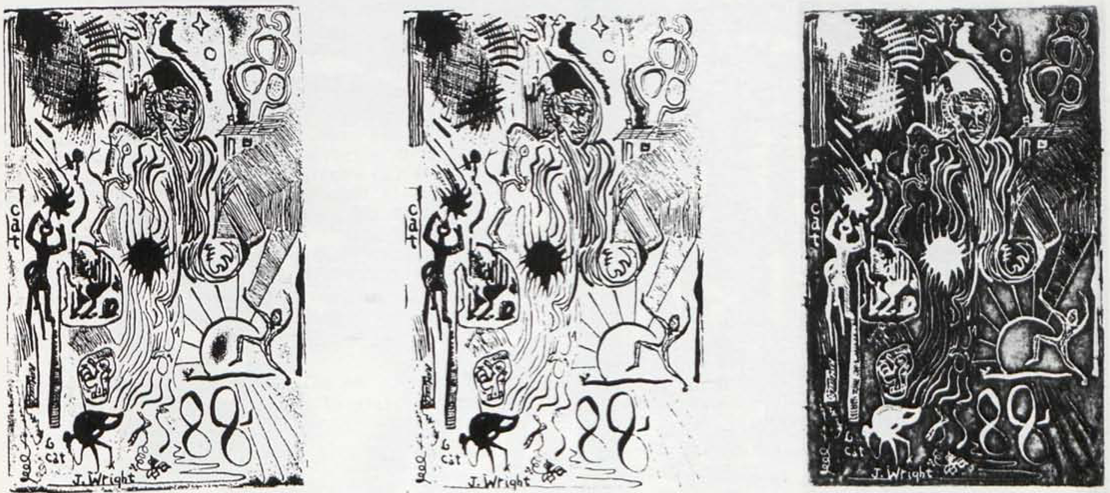
The photographically reduced group of Blake’s Songs shown here [front cover] is from a relief-etched facsimile print based on the well known electrotypes of Alexander Gilchrist’s Life of William Blake. In 1971-1972, I began a technical and historical study of Blake’s relief etching process with the support of a Study Fellowship from the American Council of Learned Societies. Owing especially to expert and generous help from Bartolomeu Dos Santos and Karl Heideken of the Slade School of Fine Art, University College, London, in which harmonious institution I had the further good fortune of being admitted to study, I made sufficient progress in learning etching and printing to discover some important and previously overlooked elements of Blake’s methods, an account of which is planned for a later issue of Blake Newsletter. In the course of testing and applying already current ideas about Blake’s process and those that arose as I worked, I made a series of relief-etched facsimiles of Blake’s designs which were then printed singly and in various groups. A variety of techniques were used in making and printing these works and I hope this account of them will prove useful to others who want to study Blake’s prime medium technically, or make such facsimiles, or, as I have tried to do recently, to teach and apply the medium for the making of new works.
After several weeks of study of traditional intaglio etching, I started to experiment with basic elements of the relief process, first trying various pens and brushes to see what kinds of lines I could reliably get onto the copper. I used Rhind’s stopping-out varnish throughout the work as the acid resistant medium with which to draw on the plates. Any fine brush of the 000-series scale seemed to work well enough after a little practice. I failed despite numerous trials to get sufficiently consistent results with metal or quill pens, even when their grooves were carefully widened to increase the flow capacity of the varnish, which was also thinned in various ways to improve flow [illus. 1a and 1b]. Ruthven Todd, however, reports (in correspondence) good success with quill and reed pens and varnish—but I do not know what scale of work and size of lines he found it effective for.
The small design shown here as illus. 2 exemplifies several characteristic difficulties of the relief process. It was drawn on a copper plate with a pen and the lettering was written backwards. Some of the lines were drawn as thin as possible and it was etched for about four hours in the 2:1 water and nitric acid formula reported by Hayter (New Ways of Gravure, London, 1966, p. 64), which seems to be too strong for work done on this scale, which approximates Blake’s. Hayter, Todd, and Miro etched the bigger designs they made “for at least nine hours until the plate had lost about begin page 33 | ↑ back to top
It was owing to generous advice from Ruthven Todd about how to prepare transfer solution that I found an effective way of preparing the plates. He indicated that for transfer one needs a less than saturated solution of gum arabic and water and a fairly well saturated solution of reasonably pure soap and water. I mixed these in ratios of 2:1 and 1:1 with equally good results.
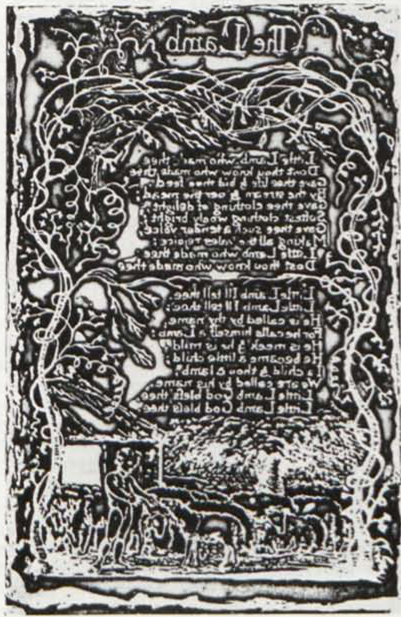
The facsimile of The Lamb [illus. 3] was made by the transfer process. It occured to me to try coating a photocopy of the Gilchrist image (taken from a 3-M copier) with the gum arabic solution and then to paint in the design with the stopping-out varnish. I taped the copy to a board to reduce curling, painted it with a wide soft brush, and found that the image showed clearly through two coats of the solution. Some time later, when the image was painted in varnish and dry, I heated the plate as for intaglio inking, set in on the bed of an intaglio press, set the image on a damp blotter, put the blotter and image paper face down on the copper, and put them through the press from which two of the usual four blankets had been removed in order to lessen the pressure slightly. I then put the plate with the papers still stuck on it into a sink into which warm and cold water were steadily flowing and left it there a few minutes until the papers floated loose from the copper. This process worked perfectly. All the varnish had transferred and I had only to retouch a few small lines which had been too thinly painted on the copy. All that remained then was to etch the plate, which I postponed until I could find a way of doing it more reliably than I had in the earlier trials.
Painting this first plate was difficult and I aimed mainly at getting, where I could, some of the minimally thin lines Blake had achieved in order to be sure they could be transferred and would then hold up under the action of the acid. I connected a few of the line systems of blossom, branch and tendril which were broken in the electrotype image (and I omitted, wobbled on, and overlooked others). I also passed over certain areas which were obviously printing smears and tried to convert the marginal areas, which are crude on many of the electrotype begin page 34 | ↑ back to top

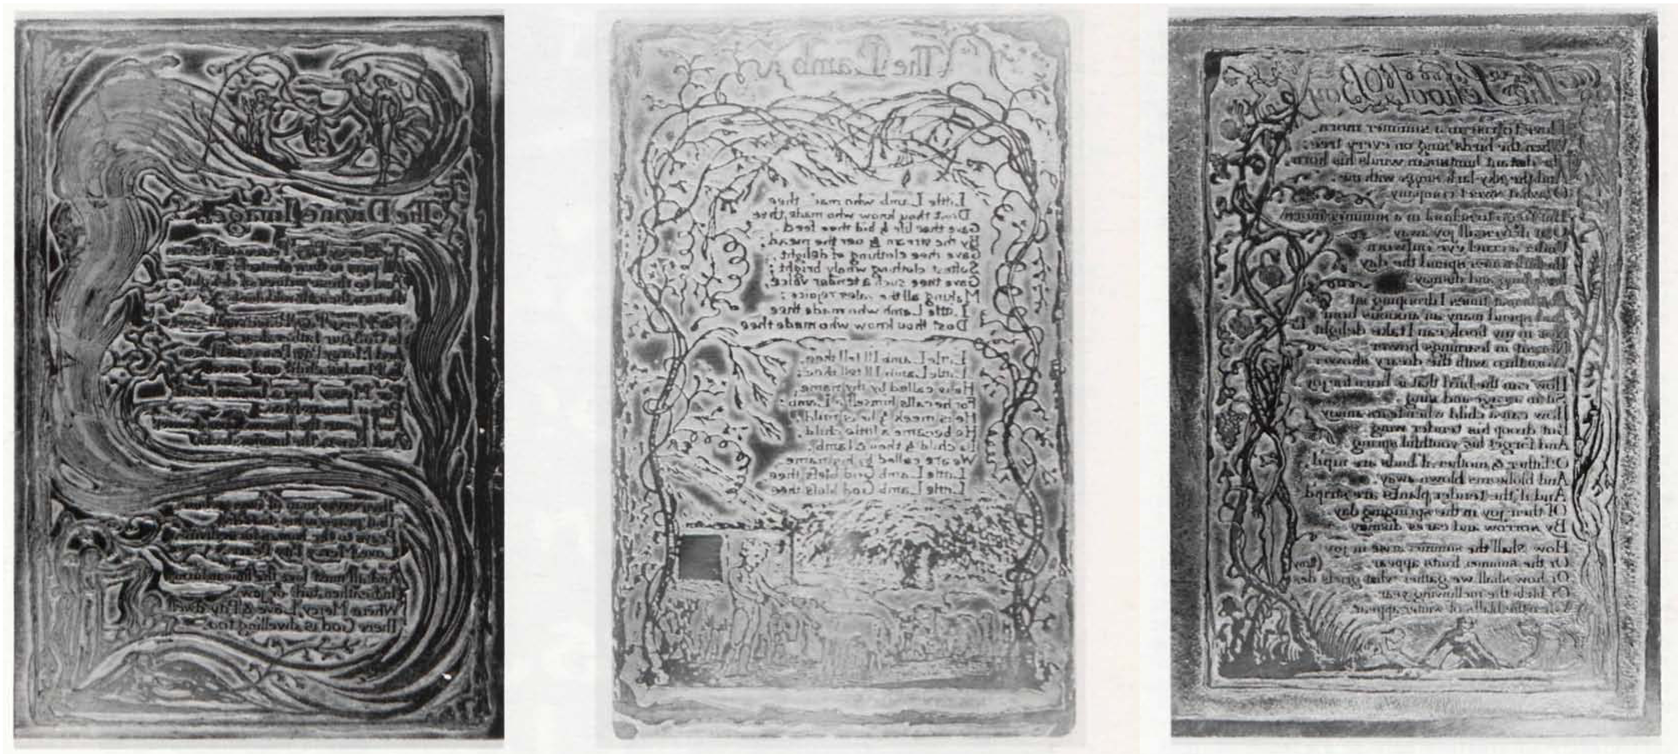
To the right An enlarged portion of the plate, showing the state of characters and the stages of repainting.

In order to get several plates to experiment with, which would, if all went well, also be good facsimiles of Blake’s works, I turned to photoetching techniques. Thanks to Karl Heideken’s knowledge and skill and the Slade’s equipment, this was technically a fairly easy matter. The first step was to prepare an image from which to make a photographic negative. I used The Lamb again and sometimes corrected a photographic copy of the Gilchrist image by drawing in lines where comparison showed breaks in the “intended” line system or by whiting out areas where the electrotype printing had produced smudges that were not part of Blake’s design [illus. 4]. By these (unsystematic) corrections I got an image not perfectly representative of Blake’s but at any rate free of some of the defects which otherwise accumulate through a series of reproductions. From the corrected image, I took a photographic negative to use as the etching design. The next step in the photoetching process is to cover a plate with a light sensitive substance which can be hardened to provide an acid resistant coating for the image. This chemical is called Kodak engraving and etching resist (KPR) which can be poured on a plate and evenly distributed by rotation in a whirler or centrifuge at 80 rpm for two minutes without heat; then 70 rpm for 10 minutes with heat. It is essential that the plate be thoroughly degreased before KPR is applied and that its surface not be touched after that until the plate is ready for etching. The whirler may not be necessary but I did not try the process without it. KPR is also available in a spray can form which I have not tried yet, but it would probably work.
Once the plate is coated with KPR it must be protected against light until it is exposed to an arc lamp or other light source; a sheet of paper is sufficient as a cover if there is only a short delay before the exposure. The film negative (which reverses the original image) is then laid down directly, its reverse or negative character upwards on the plate and exposed. The Slade has a machine called a vacuum frame which gives a maximum of closeness of fit between negative and plate for the exposure. This fit is an important element because any looseness from a wrinkle or bit of dust or any slippage during the exposure will deform the image. A carbon arc lamp was then used to sensitize the plate; a five minute burn is about right at a distance of 4.5 feet. The plate was then taken out of the frame and developed in KPR photo-developer for four minutes. The bath begin page 37 | ↑ back to top must be slowly rocked so as to both cover the developer continuously and move back and forth across the plate, working the sensitive surface. The arc lamp sensitizes the KPR under the transparent areas of the negative, which correspond to the image. The developer fixes and hardens these areas but does not affect the unsensitized areas. The next step in the process is the etching, which can be preceded by dipping the plate in the acid bath for about two seconds and then washing it off quickly. Doing this burns off the unsensitized KPR and etches the plate just enough to make the image stand out clearly from its ground, and so provides a final chance for correction of the image before etching.
The essential elements of the process up to the etching stage are a negative image, a light sensitive material for coating the plate and means for exposing and fixing the image. The whirler, vacuum frame and arc lamp are a great help, but the spray can form of KPR can be used and it would only require some practice with the kinds of light boxes commonly available in silkscreen studios (using a photo flood light of the high ultraviolet variety) to determine the amount of exposure necessary to sensitize the KPR properly. Exposure
Etching the plates proved to be the most difficult part of the whole process, and there is plenty of evidence that this was true for Blake too. To get a relief deep enough to print satisfactorily, it is necessary to bite the plate for so long a time that the sides of the lines of the design, on which the acid acts progressively as the background copper is lowered, are apt to be eroded to the point either of breakage or of such thinning as to spoil the balance on lines in the design, as illus. 1 shows. It took several trials, begin page 38 | ↑ back to top in fact, to establish the ratio of five minutes of arc light to four minutes of developer to three hours of biting. (Even then the result was only approximate to anything optimal because it was impracticable to try and stabilize the subtle variable of the acid whose action changes with its age, the temperature of the room, and several other factors.)
I solved the practical problem, however, when it occurred to me to take the plate out of the acid after about three hours and repaint the whole surface of the design with varnish at that point. That idea led me to look again at the electrotypes in the Victoria and Albert Museum, where, with the help of a very strong magnifying glass and an improved idea of what to look for, I discovered that Blake’s plates were made by stages in just this way. (I plan to give an account of this and other techniques in a later essay.)
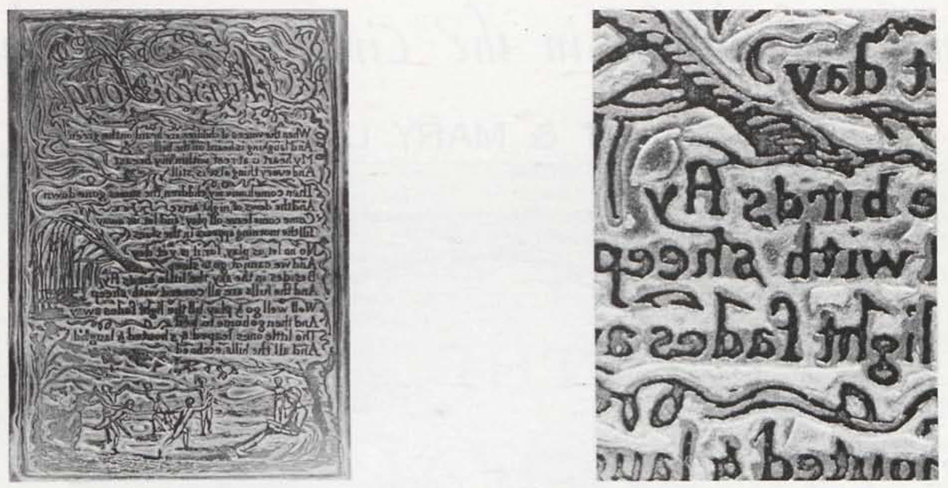
This crucial repainting procedure, which actually permits biting any relief plate to any depth desired for printing, is a simple and very laborious process of painting each relief character in varnish in such a way that a very slight amount of varnish is put over the edge of the original design to prevent erosion, especially where the acid is working in a relatively open area on both sides of a fine line. Given the scale of the work, particular judgements about that situation are difficult, so it is easier just to repaint the entire surface very carefully. Any slips with the brush, however, will deposit varnish in the wells of the etched areas and these mistakes are very difficult to correct. Scraping back areas into which varnish has spilled risks damaging the edges of the surface coating, and even if the scraping is thorough, a grease film is likely to remain which will retard the action of the acid sufficiently to create ridges or platforms which will pick up ink where it is not wanted. The scale of this work will indicate some of the difficulty of such mending procedures. The key physical facts about the primary and critical balance between surface or subsurface platforms and open and more deeply recessed areas can best be grasped by contrasting the space more or less included by the form and groups of the letters on this page with open spaces between the words and lines. The form or shape of the letter will normally support any inking surface sufficiently to prevent the ink from reaching down into its interior space but the surrounding area much more easily takes ink, as can be seen from illus. 1, or in many of the proofs and other copies of Blake’s Illuminated Books. To prevent this printing problem, I did the repainting again after a second two or three hour bite in the acid, this time more selectively. Because the close-worked groups of characters were already in sufficient relief for printing, the second repainting could cover whole groups of characters in single brush strokes, taking care only to judge beforehand whether the space between the words was in sufficiently deep relief to allow the whole line to be painted in solidly or still required that word-sized or other groups be etched separately. And again of course, it was essential not to let the varnish spread out much beyond the edge of any discrete group. Subsequently, for the wider white areas I did still another repainting, which covered nearly the whole plate and left open only the central part of the largest white areas—as notable especially in the title plate to the Songs of Experience. Blake’s skill with a brush and routing tools made it unnecessary for him to go to these extremes in making his plates, but I think it will be found a useful practice for facsimiles, or if other very fine line compositions involving large open spaces are wanted.
As the plates were being produced I began to experiment with different methods of printing them. I found that plates made in this way can be printed effectively and with a good range of different effects on an intaglio press or a printing press and by the simple and common woodcut method of rubbing with a spoon the back of a sheet of paper laid over an inked plate. Inking such plates is a delicate but not a very difficult process—not nearly as difficult as the task that Blake faced in inking and printing plates as shallowly bitten as the America 5 fragment in the Rosenwald collection or even the somewhat more deeply bitten electrotypes of the Songs.
Virtually any ink will do which can be laid down on the plate by a roller or from another inked plate, providing only that it is sufficiently smooth in texture, as well as even in the application, to preclude spreading over the edges of the characters and in the basins of the open areas. I used etching and process inks of different types but stayed with lithographic inks of different colors for the series of group prints of the kind shown here, because their evenness and saturation made it possible to pull several prints of different densities of hue from a single inking of the plates. I used relatively large and firm rubber rollers for the inking because it was possible in that way to ink several plates at once. But a common hand brayer works well enough for single prints. I etched the plates in groups of two, three, or four to save time and then usually cut them out of their frames for the printing, which meant that the roller would deposit ink heavily at the leading and trailing edges of the plates. These deposits would usually print, so it is useful to take two slightly larger plates and place them at the sides of the plate or plates to be inked as a support for the roller. Even with this support, however, the slight pressure needed for even inking and two or three passes with the roller inevitably deposits some ink along the edges. Therefore it is important to lay the back of the plate on the finger tips after the inking and wipe each edge clean before printing.
For relief printing dry and not too coarse paper is wanted. Beyond that virtually any paper consistent with the means of printing will do. An intaglio press can produce fine embossment effects from the graded elevations of the recessed platforms around the relief image. As the printing methods developed by William Hayter and others at Atelier 17 suggest, the physical structure of plates made in this way allows them to be inked in a combination of intaglio and relief techniques. (Various textures using aquatint, open biting and begin page 39 | ↑ back to top
The facsimile sets of group prints taken from my plates were all printed on a printing press using a board set on the bed to get the plates to the desired type-high position. From there they could be slightly raised or lowered by a pressure wheel on the press, but papers under the board would serve as well for that when greater or less density of color from a single inking is wanted. It is possible to pull more than one print from a given inking and this characteristic of relief printing has led me to wonder both about Blake’s proofs and whether he might not have taken more than one set of impressions of the plates of some of the Illuminated Books from certain single inkings. The control of tone permitted by successive pulls is perfectly consistent with the aim of subsequent coloration. Knowing the character of his inks, which vary a good deal, and the degrees of their tonality in the prints, would help determine the answers to this question.
The simplest method of printing relief plates made as described above is the old method of rubbing with a spoon or even rolling by hand if the ink quality is right. The interesting question of how Blake inked his plates has yet to be resolved. William Hayter and Ruthven Todd have hypothesized from the shallowness of the America 5 fragment and from the fact that nothing is now known of roller inking in Blake’s time that he must have used inked plates as surfaces from which to ink his own plates. But they have not explained how one inks a plate thinly and evenly enough without a roller to permit the application of its ink to another surface without the awful spreading effects which doom relief printing. It seems more likely to me that Blake would have used a wooden roller, perhaps a large press cylinder, both to ink plates directly and to distribute the ink on an inking plate. The varied qualities of some of the images and proofs, from heavily speckled or reticulated textures—which are the common effect of separating an inking plate from the plate it is used to lay ink on—to the strong and even tonality of other images, which are more consistent with roller techniques, suggest strongly that he used both methods as well as the technique of pulling multiple impressions from a single inking.
In summary, there is a range of relatively simple techniques for making facsimiles like those shown here, as well as original relief-etched designs in the composite art form. For all the etching processes, ferric perchloride is a good home mordant, because it does not produce dangerously noxious fumes as the Dutch and nitric acids do. For the photoetching process KPR and a light-box will serve for getting the image on the plate. For the transfer process, which eliminates the need for backwards writing and reduces the risk of hard-to-correct varnish slips on the plate (the paper around a blunder can be cut away before the transfer is made), the only essential machine is a press for getting the varnish design to adhere securely to the heated plate. (Perhaps a pair of clamps or a large horizontal bench vice would do.) Once the transfer method is made workable, any image can be coated with the gum arabic solution and painted with varnish. The critical parts are the etching process and the technique of repainting for stepped biting.